
As I become more and more proficient in the kitchen, I find that I need different tools to help me get the best results. It didn’t take me long to realize that my box grater wasn’t the best tool to use when I needed to zest a lemon. I bought a zester to perform this task. I know that the different attachments to my KitchenAid mixer help me mix cake batter, knead bread dough, or whip up a buttercream effortlessly. In the same way, I have an assortment of knives to help me do different jobs: my chef’s knife minces, slices, and dices, and my serrated bread knife cuts through freshly baked bread with ease. When choosing which tools to use in the kitchen, I have to think about my purpose. I would never consider using a rolling pin to chop onions.
The same is true for my young digital writers. They have so many tools available to them that it becomes important for me to teach them how to be critical consumers of technology. How do I help them learn to think about their purpose and which tools will help them get their meaning across to their readers?
I began by thinking about my purpose. What did I want my students to be able to do by the end of the school year? What did I want them to consider when they were composing? How would I get them there? Formulating answers to these questions helped me move forward.
- I wanted students to understand the purpose of different digital tools.
- I wanted students to be able to choose technology based on their need, audience, and purpose.
- I wanted students to make informed decisions about the digital moves they were making.
- I wanted students to to be able to reflect on these decisions.
I knew that if I wanted my students to be able to make these kinds of decisions, they were going to have to have some experience with different composition tools. The next question became, What tools would my students need to make meaning?
There are a myriad of tools out there, and I’ve made the mistake in the past of heaping too many options on my students. They ended up not being able to use any of them well. I am lucky that I work in a resource-rich district where we have a number of choices in available digital tools. So, I knew I had to be selective when making my choices. My choices might not be someone else’s choices, but that’s the beauty of having so many different tools. Once a teacher knows her purpose, the next step of choosing the tools falls into place.
| Tools to Introduce to Students |
My Reasons for Choosing the Tool |
| Google Apps for Education (including Docs, Draw, Presentation, Forms) |
|
| Kidblog |
|
| Glogster for Education |
|
| Weebly for Education |
|
| Pixie |
|
| iPhoto |
|
| Educreations |
|
By frontloading these tools, my students were able to make decisions about which one was going to make the most sense for what they wanted to accomplish. Becoming proficient with these tools did not happen overnight. I created small and some ongoing projects (a post about who I am in Glogster, blogging throughout the year in Kidblog, a book review in Pixie, and a short I Wonder project in Educreations) to teach them how to use these tools.
Through these projects, my students learned how to import images, change fonts, add video and audio recordings, and think about layout. We also discussed why a digital composer might want to make these moves. It soon became evident to them that the process for each of these moves was similar, regardless of the platform being used.
What Are You Thinking?
Through each of these projects, I modeled my own moves and made my thinking transparent.
Glogster: “Introducing Mrs. Johnson”
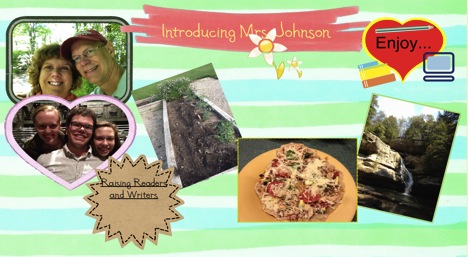
I share my reasoning for some of the digital moves I made:
- I chose to use Glogster because I wanted to use a tool that would be like making a poster. I wanted something colorful that would grab my reader’s attention and allow me to share snippets of information about myself.
- I wanted my reader to be able to see the things that I enjoy doing, so I chose pictures that show my hobbies.
- I wanted the reader to know that I love working outside, so I chose the background of blue and green stripes. They remind me of summertime when I can work in my garden.
- I included a picture of Mr. Johnson and me taken while we were hiking.
- I wanted my reader to know how much I love my kids, so I added a heart frame.
I also shared one of my blogs as an example.
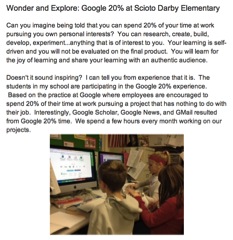
- I chose to write a blog because the information I have to share is not very long and it’s an interesting topic to me.
- I want my reader to learn more about what is happening in our classroom.
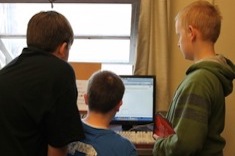
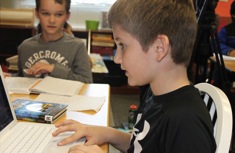
- I used these images because they show the different ways kids are working on their projects.
- I know that blog readers want to read their information quickly, so I used white space and chunked my information together.
- I wanted my reader to get more information about the topic, so I added the hyperlinks.
In addition, after each project, I’d ask my students to reflect: Tell me about the choices you made as a digital composer. What did you want your reader to learn or know? Choose three different digital moves you made and explain your thinking behind those moves. How did your choices help you get your meaning across? What do you think works well in this project? What might you do differently next time?
Bringing It All Together
With practice and feedback from me, my students began to make independent decisions about how they could best show their learning. They no longer needed me to dictate how they showed their learning. As we worked through different cycles in writing workshop, they determined which tool (including pencil and paper) would help them get their meaning across in the best possible manner. During one of our short cycle research units, I had the following things going on:
- A Pixie slide show with Spanish words and their English translations
- A collaborative website about the history of Batman
- A Glog about Christian the lion
- A Google presentation about the history of the lightbulb
- A blog about jets
- A website about why dinosaurs became extinct
- An Educreations slide show about bulldogs
- A poster with hand drawings about volcanoes
Throughout this process, students were drafting, revising, collecting images, researching, and making purposeful decisions about how to best present their information. Each student was able to articulate why they chose the tools they chose and could explain their digital moves.
Did it get messy? Yes! But I’ve found that messy is okay. My students were engaged and they were learning. Was I in charge of all the learning going on? No! In this type of environment, students are up and about, helping each other. There are 26 experts in my classroom. I co-create alongside my students.
I think back on my evolution of integrating technology into my classroom. When I began, it was all about the tools. I was excited to try anything and everything. I was the one deciding which tools students would use for which projects. Thankfully, I’ve grown. I see the value in choice and empowering students to make decisions based on their own purposes. As a result, my students are able to think about meaning and what makes sense for them.